AI Engine Claude MCP Setup for WordPress
This guide explains how to install AI Engine – The Chatbot, AI Framework & MCP for WordPress, connect it with Claude / Anthropic, enable the MCP Server, connect it with Claude Code, verify Context Mode, check Figma MCP in VS Code, and set up reusable Claude Code skills.
Security note: Never commit API keys, Bearer tokens,
.vscode/mcp.json,.claude/, or local MCP configuration files to GitHub. If a token or key was exposed in a screenshot or document, rotate it before sharing the file publicly.
Part 1 — WordPress AI Engine MCP Setup
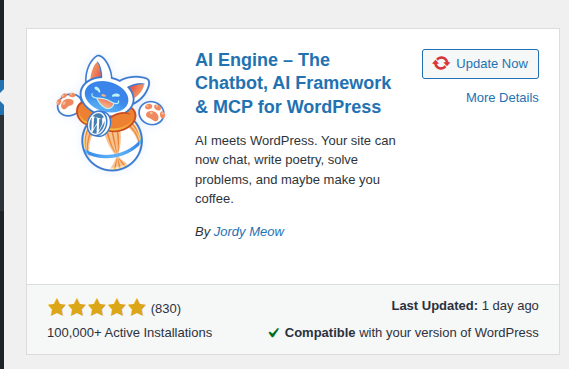
Step 1 — Install the AI Engine plugin
In WordPress Admin, go to:
Plugins → Add New Plugin
Search for:
AI Engine – The Chatbot, AI Framework & MCP for WordPress
Install and activate the plugin.
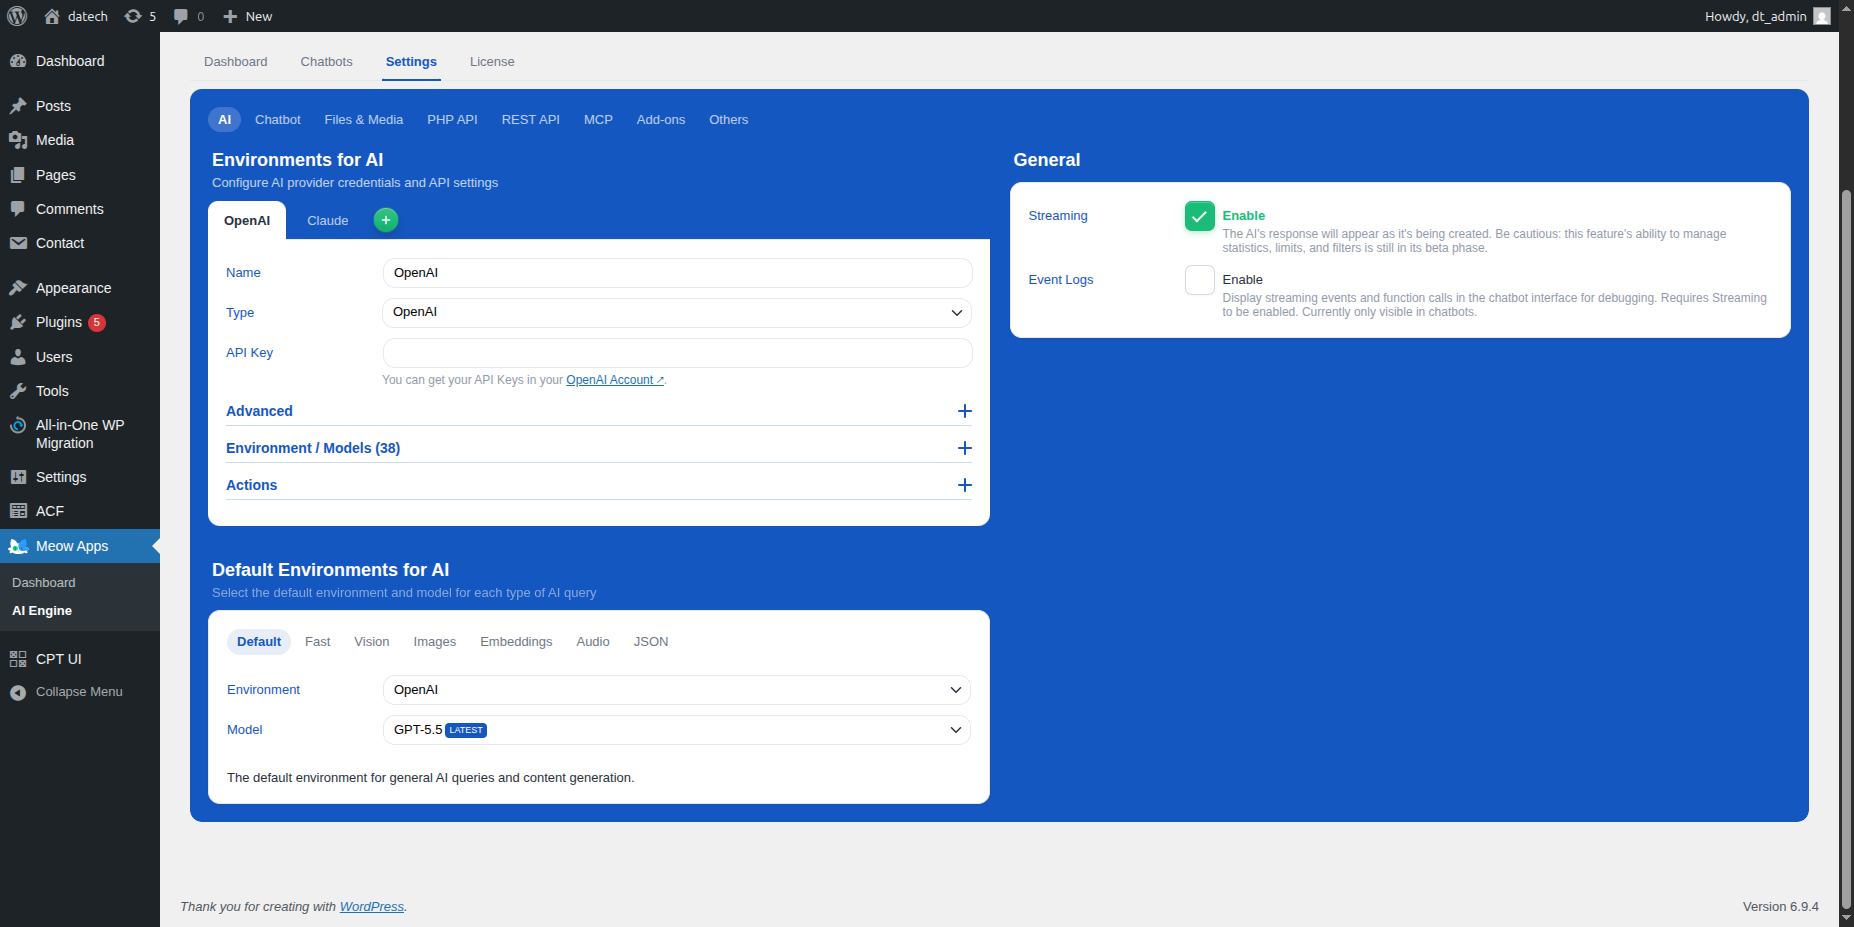
Step 2 — Open AI Engine settings
After activation, go to:
Meow Apps → AI Engine → Settings
You will see settings tabs such as:
AI
Chatbot
Files & Media
PHP API
REST API
MCP
Add-ons
Others
Step 3 — Enable MCP in AI Engine
Go to:
AI Engine → Settings → MCP
Enable the MCP server.
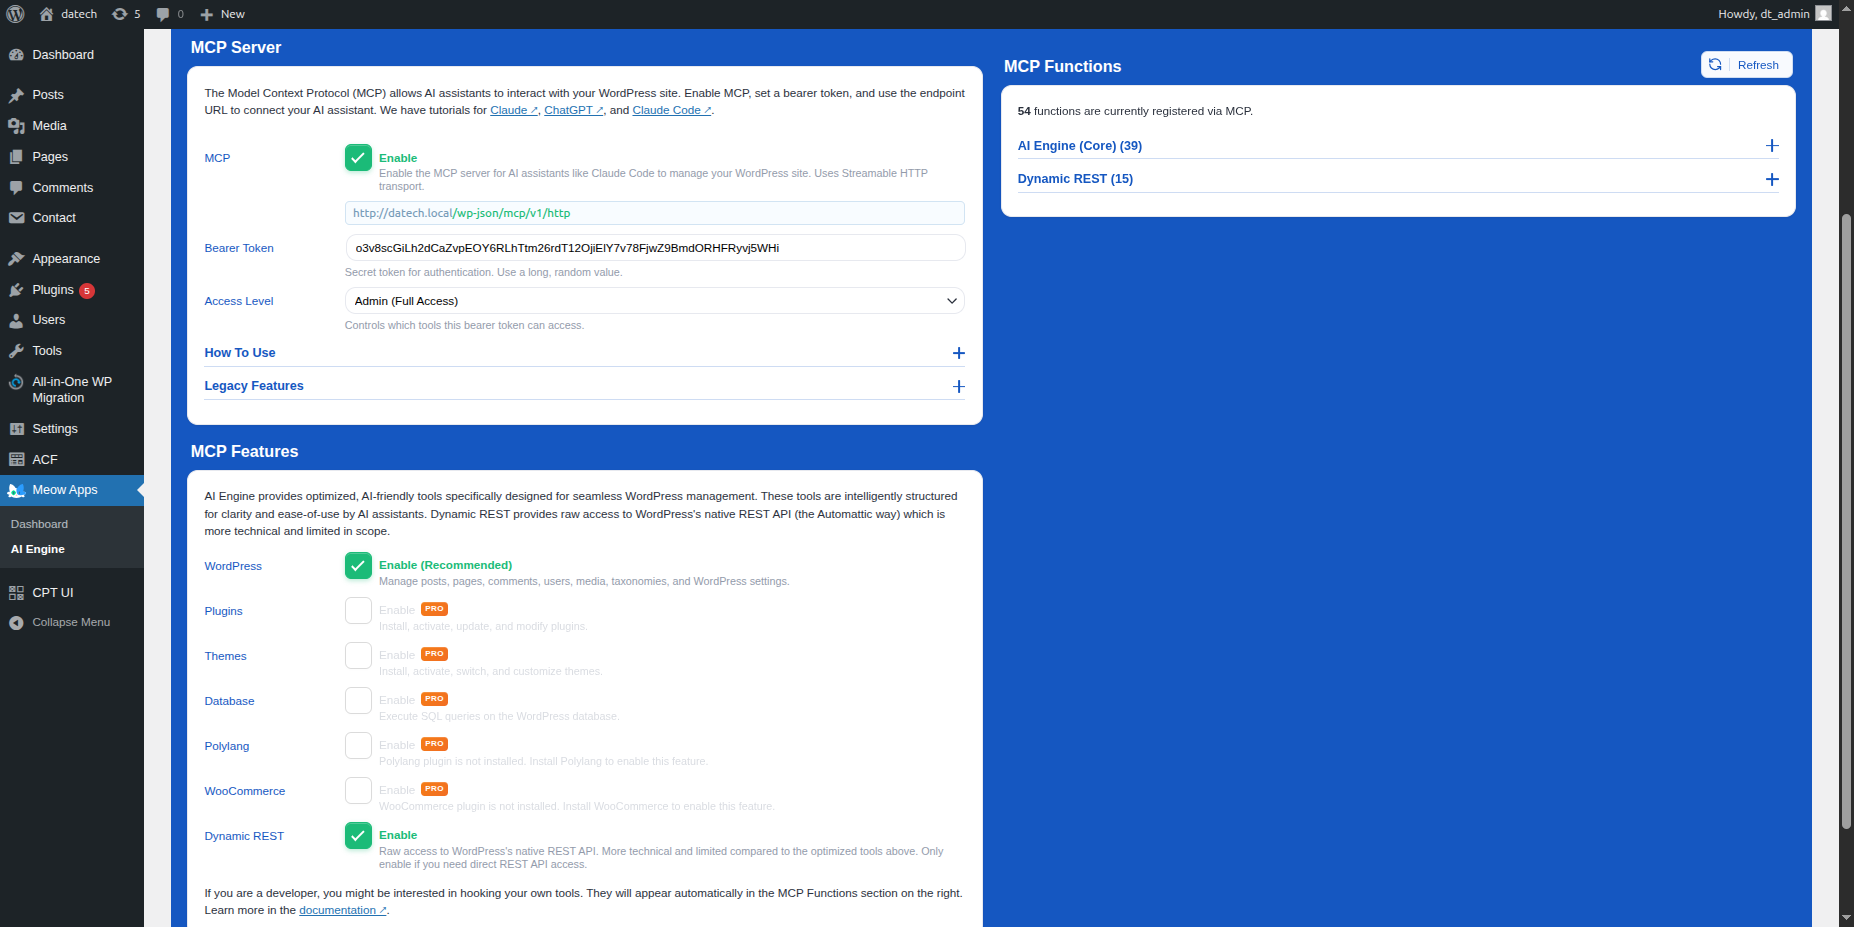
Use these settings:
MCP: Enable
Bearer Token: Create a secure random token
Access Level: Admin Full Access
Step 4 — Generate a secure Bearer token
Create a strong random token and paste it into the AI Engine MCP Bearer Token field.
You can use a secure token generator or a local command.
Linux
openssl rand -hex 32
Windows PowerShell
-join ((48..57) + (65..90) + (97..122) | Get-Random -Count 64 | ForEach-Object {[char]$_})
Windows CMD
powershell -Command "-join ((48..57) + (65..90) + (97..122) | Get-Random -Count 64 | ForEach-Object {[char]$_})"
Save the token somewhere private. You will need it when connecting Claude Code to the WordPress MCP server.
Step 5 — Enable WordPress MCP features
Inside:
AI Engine → Settings → MCP
Enable:
WordPress: Enable
This allows Claude Code to work with WordPress-related MCP features.
Step 6 — Enable Dynamic REST MCP features
Inside the same MCP settings screen, enable:
Dynamic REST: Enable
Then save the settings.
Step 7 — Copy the MCP endpoint URL
Your MCP endpoint usually follows this format:
http://your-site.local/wp-json/mcp/v1/http
For a live website, it will usually look like this:
https://your-domain.com/wp-json/mcp/v1/http
Keep this URL ready. You will use it in the claude mcp add command later.
Step 8 — Confirm the local or live WordPress URL
Before connecting Claude Code, confirm that your WordPress site is working in the browser.
LocalWP example:
http://claude-ai.local
Live website example:
https://your-domain.com
Then confirm the MCP URL:
http://claude-ai.local/wp-json/mcp/v1/http
or:
https://your-domain.com/wp-json/mcp/v1/http
Part 2 — Claude Code Setup
Step 9 — Open your WordPress theme folder in terminal
Open your terminal and go to your active theme folder.
Linux
cd "$HOME/Local Sites/claude-ai/app/public/wp-content/themes/romato"
General Linux format:
cd "$HOME/Local Sites/[site-name]/app/public/wp-content/themes/[theme-name]"
Windows PowerShell
cd "$env:USERPROFILE\Local Sites\claude-ai\app\public\wp-content\themes\romato"
General Windows PowerShell format:
cd "$env:USERPROFILE\Local Sites\[site-name]\app\public\wp-content\themes\[theme-name]"
Windows CMD
cd "%USERPROFILE%\Local Sites\claude-ai\app\public\wp-content\themes\romato"
General Windows CMD format:
cd "%USERPROFILE%\Local Sites\[site-name]\app\public\wp-content\themes\[theme-name]"
Step 10 — Check whether Claude Code is installed
Linux and Windows
claude --version
If Claude Code is installed, this command will show the installed version.
If you see claude: command not found or 'claude' is not recognized, install Claude Code first.
Step 11 — Install Claude Code if the command is missing
Use the installation method that works for your environment.
Linux
npm install -g @anthropic-ai/claude-code
Then check:
claude --version
Windows PowerShell
npm install -g @anthropic-ai/claude-code
Then check:
claude --version
Windows CMD
npm install -g @anthropic-ai/claude-code
Then check:
claude --version
Alternative Windows installer command:
Windows PowerShell and Windows CMD
curl -fsSL https://claude.ai/install.cmd -o install.cmd && install.cmd && del install.cmd
After installation, close and reopen the terminal if the claude command is still not detected.
Step 12 — Start Claude Code inside the project folder
Run this from inside your WordPress theme folder.
Linux and Windows
claude
Claude Code should open in the current project folder.
Part 3 — Context Mode Setup
Step 13 — Install Context Mode plugin
Inside Claude Code, run these plugin commands.
Linux and Windows
/plugin marketplace add mksglu/context-mode
/plugin install context-mode@context-mode
Step 14 — Reload Claude Code plugins
After installing the plugin, reload plugins.
Linux and Windows
/reload-plugins
You can also fully restart Claude Code after installing the plugin.
Step 15 — Run Context Mode doctor command
Verify Context Mode using:
Linux and Windows
/context-mode:ctx-doctor
If the command works, Context Mode is installed correctly.
Step 16 — Fix Unknown command: /context-mode:ctx-doctor
If you see:
Unknown command: /context-mode:ctx-doctor
It usually means the plugin is not installed, not loaded, or not detected in the current Claude Code session.
Run the install commands again:
Linux and Windows
/plugin marketplace add mksglu/context-mode
/plugin install context-mode@context-mode
/reload-plugins
Then restart Claude Code and test again:
Linux and Windows
/context-mode:ctx-doctor
If /reload-plugins shows 0 plugins, the plugin was not loaded. Recheck the plugin installation step and restart Claude Code.
Part 4 — Check Figma MCP Connection with VS Code
Step 17 — Find the VS Code mcp.json file
Before adding Figma MCP again, first check whether VS Code already has an MCP configuration file.
Linux
find ~ -name "mcp.json" 2>/dev/null
Windows PowerShell
Get-ChildItem -Path $env:USERPROFILE -Filter "mcp.json" -Recurse -ErrorAction SilentlyContinue | Select-Object FullName
Windows CMD
dir "%USERPROFILE%\mcp.json" /s /b
If the command returns a file path, that is the exact mcp.json file you need to check.
Step 18 — Open the exact mcp.json file path
If mcp.json exists, open the returned file path and check whether Figma MCP is already added.
Linux
nano /path/to/mcp.json
Windows PowerShell
notepad "C:\path\to\mcp.json"
Windows CMD
notepad "C:\path\to\mcp.json"
Inside the file, look for a Figma MCP server entry. If it already exists, you may not need to add it again.
Step 19 — If mcp.json is not found, open the Figma file
Open your Figma design file in Figma.
Then click outside all pages, frames, layers, or selected elements.
This is important because the MCP area may not show correctly while a frame or element is selected.
Step 20 — Open the Figma MCP dropdown
Look at the right sidebar in Figma.
Find the MCP section.
Click the plus (+) icon next to the MCP area.
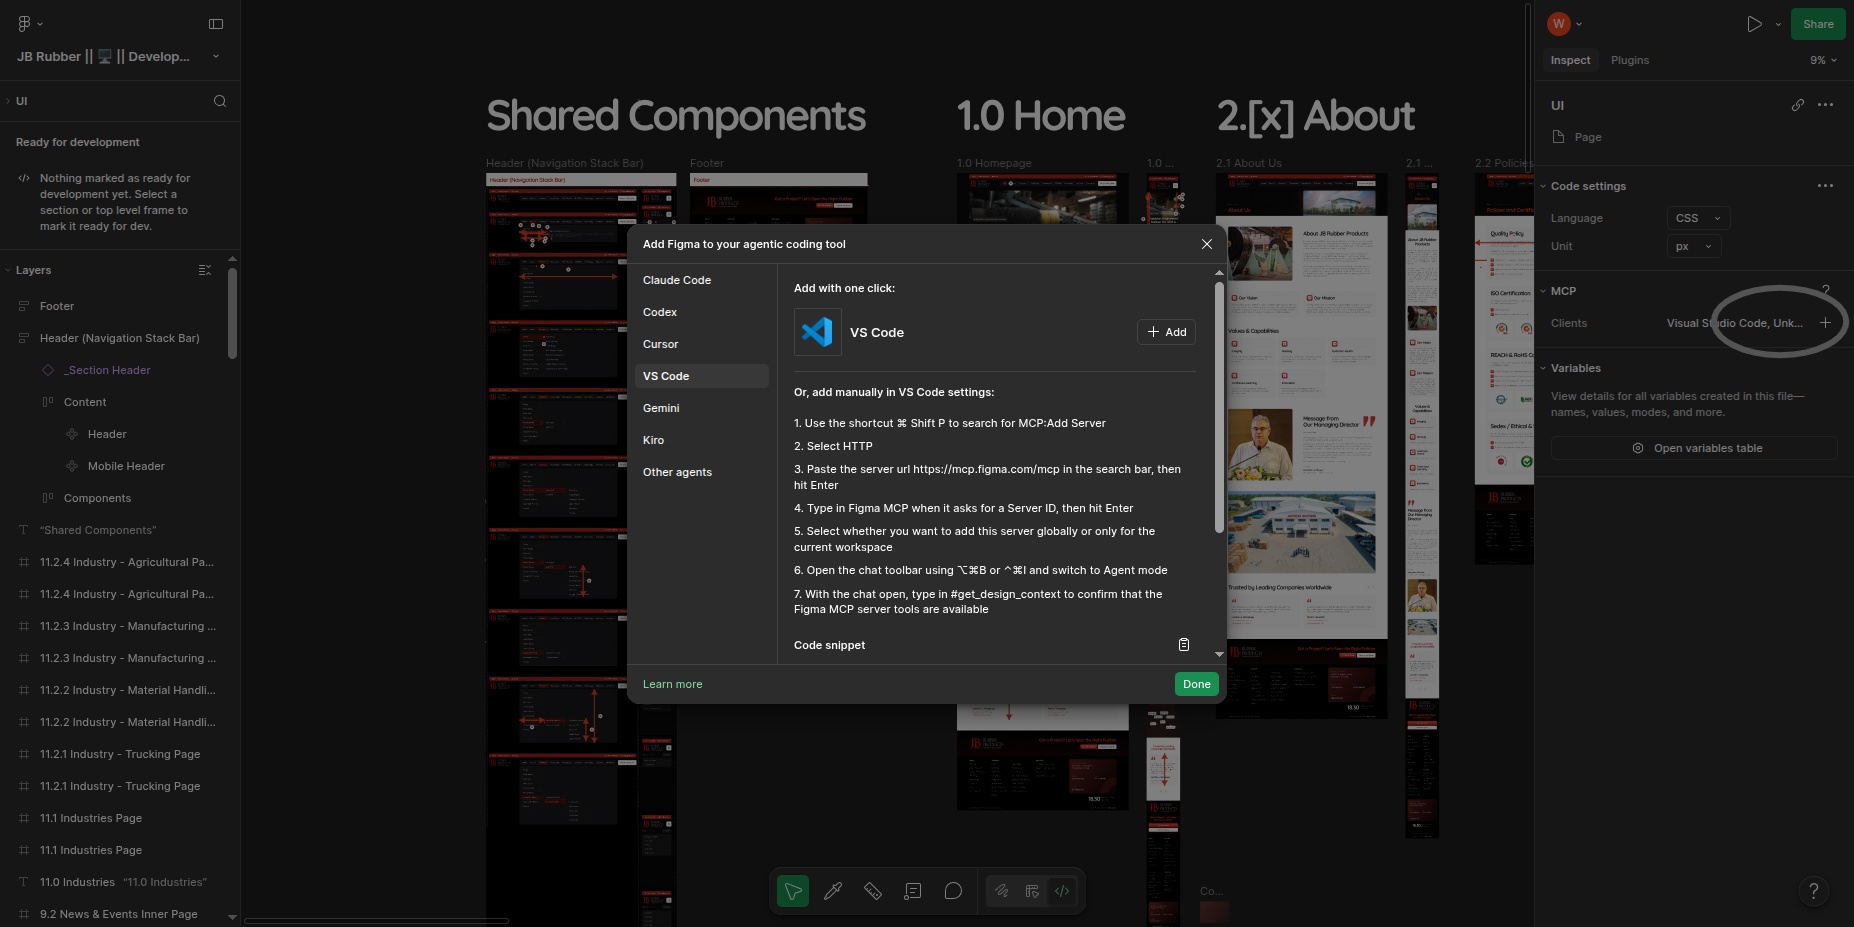
Step 21 — Select the VS Code tab
When the popup opens, select:
VS Code
Then follow the exact steps shown by Figma in that popup.
Figma may show options such as:
Add with one click
or manual VS Code MCP setup instructions.
Step 22 — Confirm Figma MCP tools are available in VS Code
After adding Figma MCP, open VS Code and switch to Agent mode.
Then test with a simple prompt:
#get_design_context
If the Figma MCP server is connected correctly, VS Code Agent mode should be able to access the Figma MCP tools.
Part 5 — Add WordPress MCP Server to Claude Code
Step 23 — Add the WordPress MCP server
Run this command from inside your project folder.
Linux and Windows
claude mcp add --transport http my-mcp-server https://your-domain.com/wp-json/mcp/v1/http --header "Authorization: Bearer YOUR_TOKEN_HERE"
Replace:
my-mcp-server
https://your-domain.com/wp-json/mcp/v1/http
YOUR_TOKEN_HERE
with your own server name, MCP URL, and Bearer token.
Step 24 — Add a LocalWP MCP example
Example LocalWP MCP command:
Linux and Windows
claude mcp add --transport http claude-ai-local http://claude-ai.local/wp-json/mcp/v1/http --header "Authorization: Bearer YOUR_TOKEN_HERE"
Step 25 — Add a live website MCP example
Example live website MCP command:
Linux and Windows
claude mcp add --transport http live-wordpress-site https://your-domain.com/wp-json/mcp/v1/http --header "Authorization: Bearer YOUR_TOKEN_HERE"
Step 26 — Check connected MCP servers
Linux and Windows
claude mcp list
You should see your WordPress MCP server listed.
Step 27 — Test the WordPress MCP connection
Inside Claude Code, ask:
List the available MCP tools.
Then ask a WordPress-specific test prompt:
Can you check the WordPress MCP tools and tell me what WordPress data you can access?
If Claude Code can see the MCP tools, the connection is working.
Part 6 — Safe Project Setup
Step 28 — Add local MCP and Claude files to .gitignore
Do not commit MCP tokens or local Claude configuration files to GitHub.
Add this to your .gitignore file:
.vscode/mcp.json
.claude/
*.local.json
.env
Linux
cat >> .gitignore <<'GITIGNORE'
.vscode/mcp.json
.claude/
*.local.json
.env
GITIGNORE
Windows PowerShell
@"
.vscode/mcp.json
.claude/
*.local.json
.env
"@ | Add-Content .gitignore
Windows CMD
(
echo .vscode/mcp.json
echo .claude/
echo *.local.json
echo .env
) >> .gitignore
Step 29 — Use placeholders in documentation
Avoid adding real tokens into:
README.md
.env
screenshots
public documentation
client handover documents
Use placeholders instead:
YOUR_TOKEN_HERE
YOUR_ANTHROPIC_API_KEY_HERE
https://your-domain.com/wp-json/mcp/v1/http
Step 30 — Recommended project workflow for new Claude Code sessions
When starting a new Claude Code session, always open the correct project folder first.
Linux
cd "$HOME/Local Sites/claude-ai/app/public/wp-content/themes/romato"
claude
Windows PowerShell
cd "$env:USERPROFILE\Local Sites\claude-ai\app\public\wp-content\themes\romato"
claude
Windows CMD
cd "%USERPROFILE%\Local Sites\claude-ai\app\public\wp-content\themes\romato"
claude
Then confirm MCP is connected:
Linux and Windows
claude mcp list
Part 7 — Claude Code Global and Project Skill Setup Guide
Use this part when you want to create a Claude Code skill that is available globally across all projects or only inside one project.
Claude Code skills are Markdown-based instructions stored in a folder named after the skill. Each skill must contain a file named exactly:
SKILL.md
Step 31 — Understand global skill folder structure
A global skill is saved inside the user-level Claude folder, so Claude Code can use it from any project.
Linux
~/.claude/skills/skill-name/SKILL.md
Example:
/home/geethma/.claude/skills/seo-friendly-website/SKILL.md
Windows PowerShell and Windows CMD
%USERPROFILE%\.claude\skills\skill-name\SKILL.md
Example:
C:\Users\YourName\.claude\skills\seo-friendly-website\SKILL.md
Step 32 — Create a global skill
Example skill name:
seo-friendly-website
Linux
mkdir -p ~/.claude/skills/seo-friendly-website
nano ~/.claude/skills/seo-friendly-website/SKILL.md
Save in Nano:
CTRL + O
ENTER
CTRL + X
Check the file:
ls -la ~/.claude/skills/seo-friendly-website
Windows PowerShell
New-Item -ItemType Directory -Force "$env:USERPROFILE\.claude\skills\seo-friendly-website"
notepad "$env:USERPROFILE\.claude\skills\seo-friendly-website\SKILL.md"
Get-ChildItem "$env:USERPROFILE\.claude\skills\seo-friendly-website"
Windows CMD
mkdir "%USERPROFILE%\.claude\skills\seo-friendly-website"
notepad "%USERPROFILE%\.claude\skills\seo-friendly-website\SKILL.md"
dir "%USERPROFILE%\.claude\skills\seo-friendly-website"
Expected file name:
SKILL.md
Step 33 — Copy an existing .md file as a global skill
If your skill file is in the Downloads folder, copy it as SKILL.md.
Linux
mkdir -p ~/.claude/skills/seo-friendly-website
cp ~/Downloads/seo-friendly-website-strategy-skill.md ~/.claude/skills/seo-friendly-website/SKILL.md
ls -la ~/.claude/skills/seo-friendly-website
Windows PowerShell
New-Item -ItemType Directory -Force "$env:USERPROFILE\.claude\skills\seo-friendly-website"
Copy-Item "$env:USERPROFILE\Downloads\seo-friendly-website-strategy-skill.md" "$env:USERPROFILE\.claude\skills\seo-friendly-website\SKILL.md" -Force
Get-ChildItem "$env:USERPROFILE\.claude\skills\seo-friendly-website"
Windows CMD
mkdir "%USERPROFILE%\.claude\skills\seo-friendly-website"
copy "%USERPROFILE%\Downloads\seo-friendly-website-strategy-skill.md" "%USERPROFILE%\.claude\skills\seo-friendly-website\SKILL.md"
dir "%USERPROFILE%\.claude\skills\seo-friendly-website"
Step 34 — Create a project-specific skill
Use this when the skill should apply only to one project.
Run the command from inside your project folder.
Linux
mkdir -p .claude/skills/seo-friendly-website
cp ~/Downloads/seo-friendly-website-strategy-skill.md .claude/skills/seo-friendly-website/SKILL.md
ls -la .claude/skills/seo-friendly-website
Windows PowerShell
New-Item -ItemType Directory -Force ".claude\skills\seo-friendly-website"
Copy-Item "$env:USERPROFILE\Downloads\seo-friendly-website-strategy-skill.md" ".claude\skills\seo-friendly-website\SKILL.md" -Force
Get-ChildItem ".claude\skills\seo-friendly-website"
Windows CMD
mkdir ".claude\skills\seo-friendly-website"
copy "%USERPROFILE%\Downloads\seo-friendly-website-strategy-skill.md" ".claude\skills\seo-friendly-website\SKILL.md"
dir ".claude\skills\seo-friendly-website"
Project skill path:
project-folder/.claude/skills/seo-friendly-website/SKILL.md
Step 35 — Understand global skill vs project skill
Global skill
Use this when the skill should be available for every project.
~/.claude/skills/skill-name/SKILL.md
Best for:
- SEO rules
- coding style rules
- reusable WordPress rules
- reusable React rules
- company-wide conventions
- personal workflow rules
Project skill
Use this when the skill belongs only to one project.
project-folder/.claude/skills/skill-name/SKILL.md
Best for:
- one client website
- one theme
- one app
- project-specific ACF fields
- project-specific coding standards
- project-specific deployment rules
Step 36 — Recommended skill naming rules
Use simple folder names.
Good:
weblankan-theme
seo-friendly-website
wordpress-acf-sections
nextjs-seo
woocommerce-custom-theme
Avoid:
SEO Friendly Website Skill Latest Final Version
My Skill!!!
skill.md
Folder name becomes the skill identity, so keep it lowercase and readable.
Step 37 — Example SKILL.md template
Create this file:
~/.claude/skills/example-wordpress-section/SKILL.md
Content:
# Example WordPress Section Skill

## Purpose

Use this skill when creating WordPress theme sections.

## Instructions

- Follow the existing theme structure.
- Check existing files before creating new files.
- Use mobile-first SCSS.
- Use ACF fields safely.
- Escape all output.
- Use reusable template parts.
- Do not remove existing code unless requested.

## PHP Rules

- Use `esc_html()` for plain text.
- Use `esc_url()` for URLs.
- Use `esc_attr()` for attributes.
- Use `wp_kses_post()` for WYSIWYG content.
- Use `wp_reset_postdata()` after custom WP_Query loops.

## SCSS Rules

Use mobile-first SCSS:

```scss
.common-section {
  // Mobile styles
}

// ── Tablet ───────────────────────────────────────────────────────
@media only screen and (min-width: 768px) {
  .common-section {
    // Tablet styles
  }
}

// ── Desktop ──────────────────────────────────────────────────────
@media only screen and (min-width: 1024px) {
  .common-section {
    // Desktop styles
  }
}
```

## Output Rules

When creating a new section, provide:

- PHP template part
- SCSS file
- CSS enqueue update
- ACF field notes
- Page integration example
Step 38 — Example: Create Web Lankan Theme skill globally
Linux
mkdir -p ~/.claude/skills/weblankan-theme
cp ~/Downloads/weblankan-theme-claude-code-skill-v2-webp.md ~/.claude/skills/weblankan-theme/SKILL.md
ls -la ~/.claude/skills/weblankan-theme
claude
Windows PowerShell
New-Item -ItemType Directory -Force "$env:USERPROFILE\.claude\skills\weblankan-theme"
Copy-Item "$env:USERPROFILE\Downloads\weblankan-theme-claude-code-skill-v2-webp.md" "$env:USERPROFILE\.claude\skills\weblankan-theme\SKILL.md" -Force
Get-ChildItem "$env:USERPROFILE\.claude\skills\weblankan-theme"
claude
Windows CMD
mkdir "%USERPROFILE%\.claude\skills\weblankan-theme"
copy "%USERPROFILE%\Downloads\weblankan-theme-claude-code-skill-v2-webp.md" "%USERPROFILE%\.claude\skills\weblankan-theme\SKILL.md"
dir "%USERPROFILE%\.claude\skills\weblankan-theme"
claude
Inside Claude Code:
Use the weblankan-theme skill and create a new ACF-based home page section.
Step 39 — Example: Create SEO skill globally
Linux
mkdir -p ~/.claude/skills/seo-friendly-website
cp ~/Downloads/seo-friendly-website-strategy-skill.md ~/.claude/skills/seo-friendly-website/SKILL.md
ls -la ~/.claude/skills/seo-friendly-website
claude
Windows PowerShell
New-Item -ItemType Directory -Force "$env:USERPROFILE\.claude\skills\seo-friendly-website"
Copy-Item "$env:USERPROFILE\Downloads\seo-friendly-website-strategy-skill.md" "$env:USERPROFILE\.claude\skills\seo-friendly-website\SKILL.md" -Force
Get-ChildItem "$env:USERPROFILE\.claude\skills\seo-friendly-website"
claude
Windows CMD
mkdir "%USERPROFILE%\.claude\skills\seo-friendly-website"
copy "%USERPROFILE%\Downloads\seo-friendly-website-strategy-skill.md" "%USERPROFILE%\.claude\skills\seo-friendly-website\SKILL.md"
dir "%USERPROFILE%\.claude\skills\seo-friendly-website"
claude
Inside Claude Code:
Use the seo-friendly-website skill and create an SEO-friendly sitemap and page structure.
Step 40 — Update an existing global skill
Linux
nano ~/.claude/skills/seo-friendly-website/SKILL.md
Or replace it with a new MD file:
cp ~/Downloads/updated-seo-skill.md ~/.claude/skills/seo-friendly-website/SKILL.md
Windows PowerShell
notepad "$env:USERPROFILE\.claude\skills\seo-friendly-website\SKILL.md"
Or replace it:
Copy-Item "$env:USERPROFILE\Downloads\updated-seo-skill.md" "$env:USERPROFILE\.claude\skills\seo-friendly-website\SKILL.md" -Force
Windows CMD
notepad "%USERPROFILE%\.claude\skills\seo-friendly-website\SKILL.md"
Or replace it:
copy "%USERPROFILE%\Downloads\updated-seo-skill.md" "%USERPROFILE%\.claude\skills\seo-friendly-website\SKILL.md"
Step 41 — Test skill detection
Open Claude Code:
Linux and Windows
claude
Then ask:
List all available skills.
Then test:
Use the seo-friendly-website skill and explain what rules you will follow.
Part 8 — Troubleshooting
Step 42 — Claude command not found
Install Claude Code:
Linux
npm install -g @anthropic-ai/claude-code
Windows PowerShell
npm install -g @anthropic-ai/claude-code
Windows CMD
npm install -g @anthropic-ai/claude-code
Then run:
Linux and Windows
claude --version
Step 43 — MCP connection not working
Check these points:
1. AI Engine MCP is enabled.
2. The Bearer token is correct.
3. The MCP URL is correct.
4. WordPress and Dynamic REST MCP features are enabled.
5. The local WordPress site is running.
6. The Authorization header uses this format:
   Authorization: Bearer YOUR_TOKEN_HERE
Check MCP servers:
Linux and Windows
claude mcp list
Step 44 — LocalWP domain not resolving
Check whether the local site is running in LocalWP and confirm the exact local domain.
Example:
http://claude-ai.local
Then confirm the MCP URL:
http://claude-ai.local/wp-json/mcp/v1/http
Step 45 — Authorization header format issue
Use this format exactly:
Authorization: Bearer YOUR_TOKEN_HERE
Example command:
Linux and Windows
claude mcp add --transport http claude-ai-local http://claude-ai.local/wp-json/mcp/v1/http --header "Authorization: Bearer YOUR_TOKEN_HERE"
Step 46 — Figma MCP not visible in VS Code
First find mcp.json again:
Linux
find ~ -name "mcp.json" 2>/dev/null
Windows PowerShell
Get-ChildItem -Path $env:USERPROFILE -Filter "mcp.json" -Recurse -ErrorAction SilentlyContinue | Select-Object FullName
Windows CMD
dir "%USERPROFILE%\mcp.json" /s /b
If no file exists, return to Figma, click outside all elements, open the MCP dropdown using the plus (+) icon, select VS Code, and follow Figma’s exact instructions.
Step 47 — Context Mode command not found
If this command fails:
/context-mode:ctx-doctor
Run:
Linux and Windows
/plugin marketplace add mksglu/context-mode
/plugin install context-mode@context-mode
/reload-plugins
Then restart Claude Code and test again.
Step 48 — Skill not detected
Check the skill file path.
Linux
ls -la ~/.claude/skills/seo-friendly-website
Windows PowerShell
Get-ChildItem "$env:USERPROFILE\.claude\skills\seo-friendly-website"
Windows CMD
dir "%USERPROFILE%\.claude\skills\seo-friendly-website"
Make sure the file name is exactly:
SKILL.md
Not:
skill.md
Skill.md
SKILL.md.txt
seo-skill.md
On Windows, enable file extensions:
File Explorer → View → Show → File name extensions
Then rename:
SKILL.md.txt
to:
SKILL.md
Part 9 — Quick Command Summary
Linux quick command summary
cd "$HOME/Local Sites/claude-ai/app/public/wp-content/themes/romato"
claude --version
claude
claude mcp add --transport http claude-ai-local http://claude-ai.local/wp-json/mcp/v1/http --header "Authorization: Bearer YOUR_TOKEN_HERE"
claude mcp list
find ~ -name "mcp.json" 2>/dev/null
Windows PowerShell quick command summary
cd "$env:USERPROFILE\Local Sites\claude-ai\app\public\wp-content\themes\romato"
claude --version
claude
claude mcp add --transport http claude-ai-local http://claude-ai.local/wp-json/mcp/v1/http --header "Authorization: Bearer YOUR_TOKEN_HERE"
claude mcp list
Get-ChildItem -Path $env:USERPROFILE -Filter "mcp.json" -Recurse -ErrorAction SilentlyContinue | Select-Object FullName
Windows CMD quick command summary
cd "%USERPROFILE%\Local Sites\claude-ai\app\public\wp-content\themes\romato"
claude --version
claude
claude mcp add --transport http claude-ai-local http://claude-ai.local/wp-json/mcp/v1/http --header "Authorization: Bearer YOUR_TOKEN_HERE"
claude mcp list
dir "%USERPROFILE%\mcp.json" /s /b
Final Claude Code test prompts
After setup, open Claude Code and test:
List all available MCP tools.
Can you check the WordPress MCP tools and tell me what WordPress data you can access?
List all available skills.
Use the seo-friendly-website skill and explain what rules you will follow.
#get_design_context